How to Hatch Eggs at Home Without Incubator
If you buy an item via links on this page, we may earn a commission. Our editorial content is not influenced by commissions. Read the full disclosure.
Most people who raise their own chickens eventually want to expand their flock size. One way of doing this is by purchasing new chicks from the local store.
However, there's an easier and cheaper way: Hatching eggs on your own.
If you have never considered hatching your own eggs I encourage you to educate yourself on how to do this and try it because it really isn't hard and it will save you a lot of time and money. Plus, raising chicks that you hatched by yourself brings a different feeling of satisfaction.
When I first decided to hatch my own eggs it was during an emergency situation with our flock, and I had no idea what I was doing. It was stressful, to say the least.
Don't wait until you are in a situation where you have to hatch your own eggs. Learn how to now, and you never have to worry.
You just might fall in love with the whole process.
Let's get started.
1. Time to Shop for an Incubator
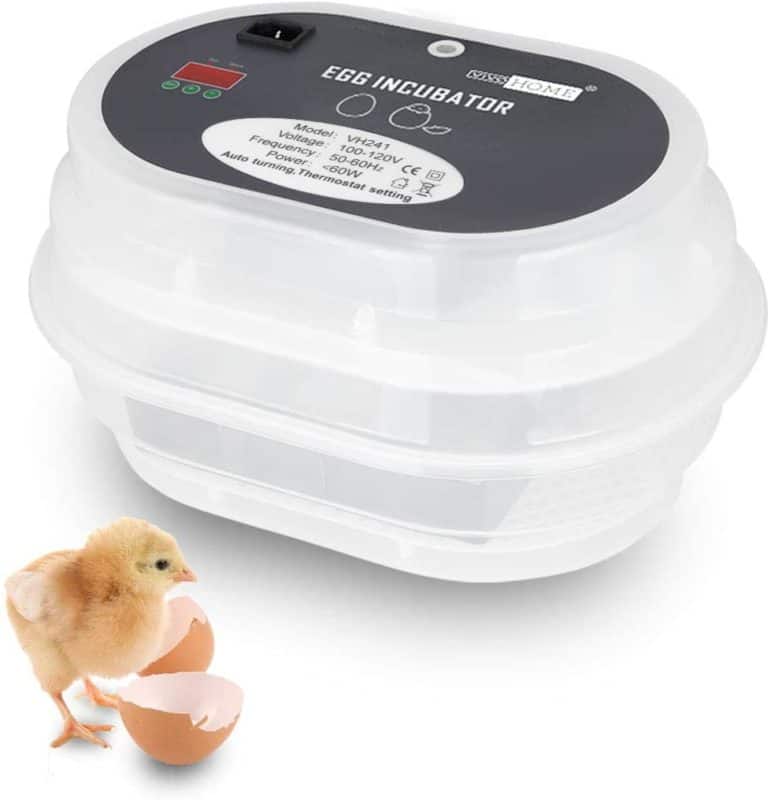
Buying a solid incubator is vital in the process of hatching chicken eggs. The reason is that you need to maintain a constant temperature and humidity level to have any success in hatching your own eggs.
Let's see what you should consider when buying an incubator:
- Price: In most instances, you get what you pay for. So you don't want to go over and above on the purchase price, but don't be disappointed in quality if you buy a cheaper one. Finding an incubator with good reviews is probably a good choice
- Manual or Automatic Controls: This refers to an egg turner. Obviously having an automatic egg turner will take the pressure off of you during the process. However, we will talk more about turning eggs in a bit
- Forced or Still Air: You need forced air because it usually means that the air is distributed equally
- Ease Of Cleaning: When the eggs hatch they make a mess. And if your incubator is not cleaned well, it is the perfect place to incubate diseases as well. So choosing an incubator that is easy to clean will be a tremendous gift to yourself after your first hatching experience
Buying an incubator will also ease some of your workload and you will enjoy watching the whole process.
However, if you are feeling extra ambitious and confident then you can build your own incubator.
2. Getting Your Incubator Ready
After purchasing your incubator, you need to set the temperature to 99.5°F. Then you have to set your humidity to 40-50% for the first 18 days and 65-75% for the final days. Now, it is important to mention that if your temperature rises by 1° or lowers by 1° that is enough to end an embryo's life.
You need to give your incubator around 24 hours to get up to temperature and humidity level so it will be able to begin the incubating process for your eggs.
I'll be honest, during my first time trying to hatch eggs, I fell flat because of this vital step. I just didn't give my incubator enough time to warm up and I ended up losing a lot of eggs in the process.
As you can tell, having the right incubator and allowing that incubator time to get adjusted so it can function at its optimum temperature is vital in the hatching process.
3. Put the Heat to Fertile Eggs
If you have a rooster in with your flock, it is safe to assume that most of your hens' eggs will be fertile.
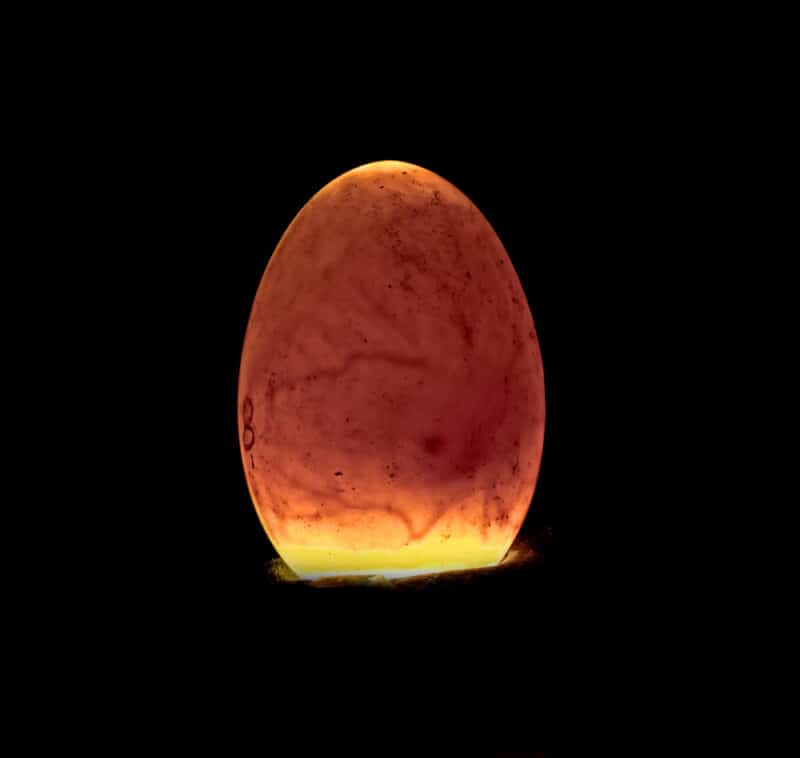
However, how can you be sure? Well, you can use the candling method.
Begin by choosing eggs that are clean, not misshaped, and those that are a good size too.
Choose fresh eggs that were laid that day if possible.
In the incubating process, you can tell if the embryo is growing by holding a candle up to the egg. You should then be able to see growth within the egg.
– Utilizing the Incubator
First of all, it's important to know that you shouldn't clean the eggs when you pull them from your hen's clutch. The reason is that there is a coating that is naturally placed on the egg that is meant to protect the embryo.
If removed, your embryo will not survive.
As I've mentioned above, fresh eggs are better. However, if for some reason you are not ready to incubate your eggs, they can be placed in an egg carton and stored between 50-60°F for up to 10 days.
Store your eggs with the fat side of the egg pointed up.
When you are ready to place your eggs in the incubator, keep them there for 21 days. You have to check the temperature and humidity regularly. By regularly, I mean, check it as if life depends upon it because, in reality, it does.
If by some chance the humidity is too high or low, use a damp sponge of differing sizes. Depending on if you need more or less humidity.
You may also have to add more water to the incubator over the first 18 days.
When you reach day 18 you will definitely want to add water to the incubator to raise the humidity level.
You can purchase an incubator that turns your eggs for you, but if you choose to turn them manually you will have to mark each side with an X and an O. This will help you keep track of which eggs have been turned and which have not.
Turn the eggs at least 3 times each day, if not more.
If you do turn the eggs more than 3 times be sure it is an odd number of times so the embryo does not rest on the same side of the egg for 2 nights in a row.
Continue to turn your eggs until day 18.
If this sounds like too much work for you then you can always purchase an egg turner too.
After the first 18 days, you will leave the eggs alone to hatch.
4. The Chicks Will Make Their Debut
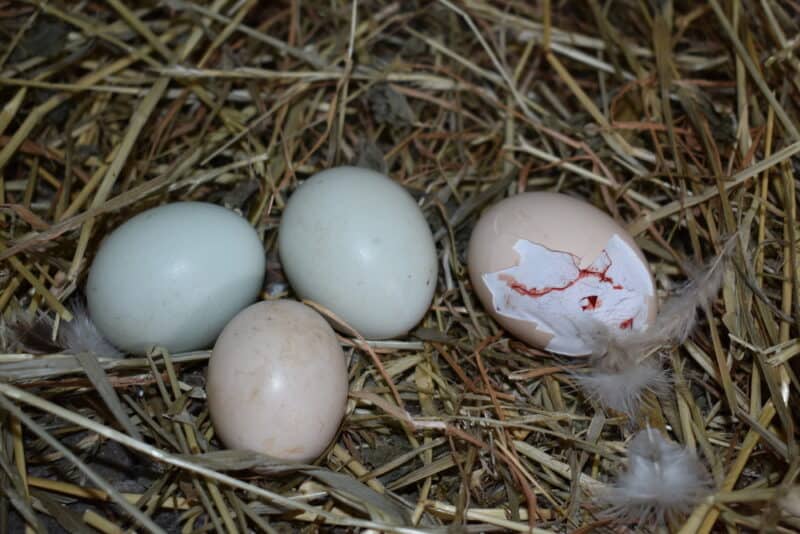
By day 18, you will probably begin to see the eggs moving on their own. This is because the chick has formed and is beginning the hatching process. Leave them be. The chick will begin to peck a small hole through the larger end of the egg.
When they do this, the chick will take its first breath. Then the chick will rest from anywhere from 6-12 hours. This allows their lungs to adjust to breathing air outside of the egg.
So don't panic.
Some people think something might have gone wrong with their chicks. However, you can't do anything to help the hatching process along as the birds are very fragile in this state. You don't want to cause injury.
After the 6-12 hour resting period, the chick will finish out the hatching process.
Let the chick be and dry inside the incubator.
Once they are completely dry, you can transition them to a brooder box where they will live until they are ready to get out on their own.
5. What You Should Do with Your New Chicks
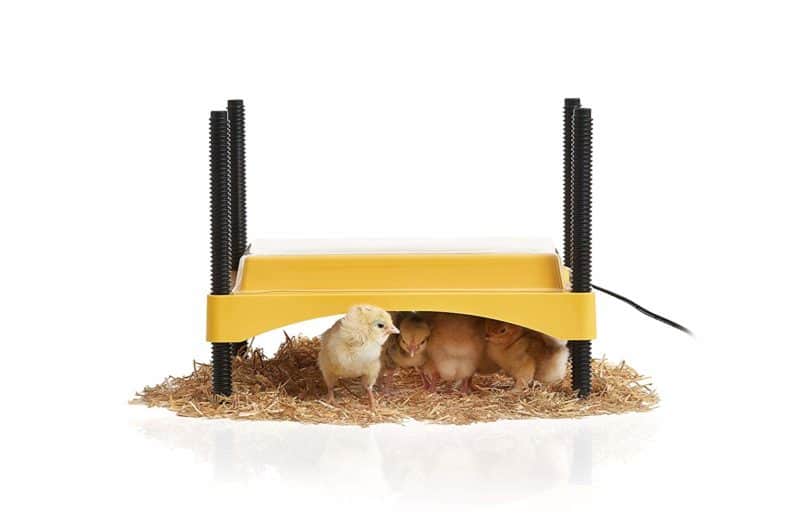
Once your chicks have been moved to their brooder box you need to be sure that they have a heat lamp on them for warmth.
Set the brooder's temperature based on your chick's age, start with 95ºF on the first week then decrease 5º per week until they are full-feathered (usually week 6-8). Or, stop at 70ºF.
Then you need to supply them with chick starter feed and water. At 6 weeks old, you can slowly begin to introduce the chicks to the rest of the flock.
As an example of how we do this, we move our chicks to a tractor. This allows them to get acclimated with the other chickens but still be protected from the endless pecking that takes place with the pecking order.
That's all you need to know about hatching chicken eggs.
There's one more way to do it: without an incubator. If you don't want to purchase an incubator and a brooder, you might want to try this method.
How to Hatch Chicks Without Incubator
1. Spot Your Broody
Spotting a broody hen is pretty easy: She will be the one that hangs out in the nesting box.
However, not all breeds of chickens will go broody. The best broody breeds are Silkies and Cochins. If you would prefer to hatch eggs the natural way then you should keep these breeds in mind when buying your chickens.
Another way of identifying a broody chicken is that she will most likely become more aggressive. When you go to collect eggs she will peck and growl at you. And at times, she will become more aggressive towards the rest of the flock.
Also, you can tell when a hen is going broody because she will only get up a couple of times a day to eat, drink, and go to the bathroom. So if you begin to notice your hen excreting larger than normal amounts at once don't panic. She is probably just going broody.
2. Decide Where You Will Let Her Nest
You have 2 options: The first option is allowing her to sit right where she is at.
Broody hens usually nest in the favorite nesting box. The problem is, other hens might lay eggs under her or get inside the nest and move eggs around which could consequently bust them. However, the upside is you don't have to move her or worry about providing separate necessities for her.
You should also be aware that after her eggs hatch, she will leave newer eggs to care for her chicks once they hatch. Therefore, leaving a bunch of half-cooked eggs to rot.
You might have to step in and incubate those eggs with an incubator at that point.
Incubating chicken eggs is more or less the same as incubating duck eggs. However, you must know the differences between chicken and duck eggs and the importance of why these differences exist.
When incubating your chicken eggs, try to mark the newer eggs if possible.
The second option is to move her to another box.
Be prepared to get pecked when you do this. It is probably best to move her at night. You'll have her nest, food, and water already set up so you can simply pick her up and put her back on her eggs where she will be happy again.
3. Incubating, Hatching, and Raising New Chicks

This step is really easy on you because she does all of the work.
She will continue to sit on these eggs, keep them warm, and move them as frequently as they need to be moved. Once they have hatched she will care for her chicks too.
After they are hatched, you have another set of decisions to make:
Are you going to keep her separate from the flock to raise them?
Or are you going to allow her to raise them with the flock?
The upside of allowing her to raise the chicks with the flock is that the broody hen is allowed to interact with the flock as usual. This allows the chicks to be integrated a little easier as well.
However, the downside to this is that the chicks are less protected from predators. And because chicks can only eat starter feed, this means the whole flock has to go with starter feed.
That can become very expensive, very quickly.
However, if you decide to keep the mother hen and her chicks separate, they miss out on interacting with the rest of the flock. However, the chicks are better protected from predators. And you have to feed fewer birds starter feed which is much easier on your wallet.
Well, there you have it, folks. That's how you hatch chicken eggs naturally or with an incubator.
Was this article helpful?
Yes No
How to Hatch Eggs at Home Without Incubator
Source: https://morningchores.com/hatching-eggs/
0 Response to "How to Hatch Eggs at Home Without Incubator"
Post a Comment